Contact Us

Use the form on the right to contact us.

You can edit the text in this area, and change where the contact form on the right submits to, by entering edit mode using the modes on the bottom right. 


123 Street Avenue, City Town, 99999

(123) 555-6789

email@address.com


You can set your address, phone number, email and site description in the settings tab.
Link to read me page with more information.

A Bee's Life

Stuff & Nonsense

Filtering by Tag: low carb

An Unmeasured Approach: The NYTimes' Spinach Artichoke Dip

spinach artichoke dip in a lowcarb tortilla bowl.pngThe NYTimes' has a great low-carb, keto-friendly recipe for spinach artichoke dip. Hooray!Unfortunately, in my hunger and excitement, I did not have the patience to measure out the ingredients. So, for this meal (Ben and I ate it for dinner – he with bread and potato chips, I with a lowcarb tortilla and strips of bacon), I kinda just eyeballed the amounts until I thought things looked (and tasted) good.Find the recipe here. A couple more pics of how mine turned out, plus a couple of notes after the cut.all the extra paremsan cheese you can handleThe NYT's recipe suggests you can eat the dip without baking, but baking makes it SO MUCH BETTER. For maximum surface area, I spread the dip into a large pie pan, sprinkled heavily with parmesan cheese, and popped it under the broiler for 10 minutes.yummy browned top of a spinach artichoke dipLook how yummy! I took a video of this bubble gooey-ness, but it's pretty NSFW. I have it saved to my desktop in a folder named "Normal Stuff Not Porn." Why do people always wanna look in there? It's just normal stuff, not porn. ¯\_(ツ)_/¯spinach artichoke dip in a lowcarb tortilla bowlIt's easy to go overboard and just pour the whole damn pie pan of dip into your mouth, but I'm a goddamn lady, so I don't fuck with that shit. Instead, I made things ever the more complicated by making a little bowl out of a low-carb tortilla and filling it with dip. I wanna say it was about portion control, but really it was about claiming the majority for myself. Snooze lose, Ben!I wish I could have some right now, but we ate it all. I finally I understand that saying about having your cake and eating it too. They should change it to "spinach artichoke dip." More folks would get it.Anywho, hope you're swell!

Quickie Trick for Reheating Leftovers: Salami Cups

leftovers in salami cups .png
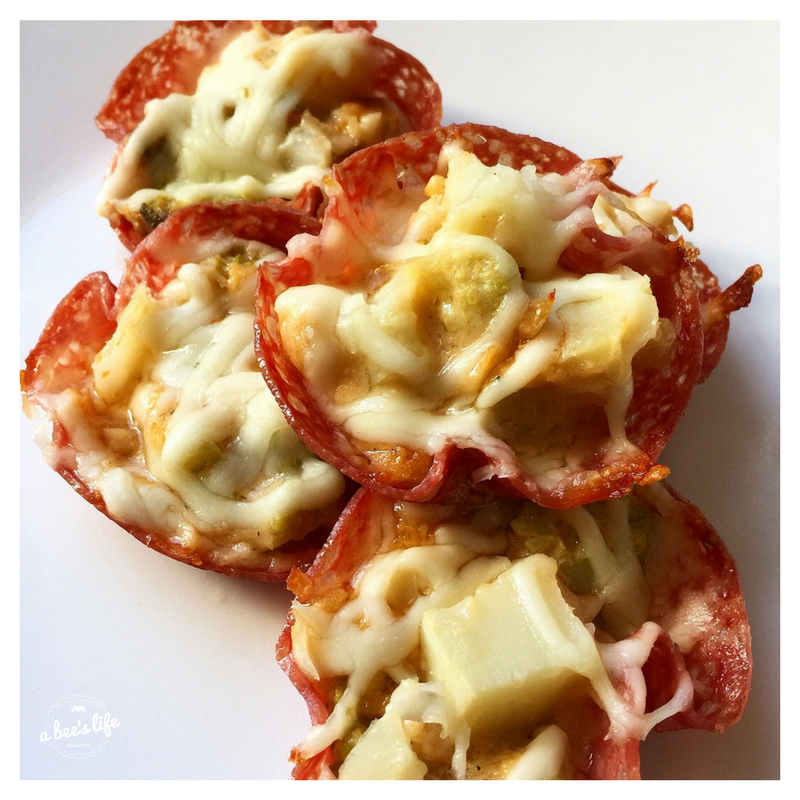
Not exactly a recipe, but here's a little something I made for breakfast the other day – leftovers reheated in little cups made of salami. Just pop the salami in a muffin tin, fill with whatever low-carb, keto-friendly leftover you have on hand, top with cheese, and pop in the a 350 degree oven for ten minutes until the cheese has melted and the leftovers are reheated. More pics after the cut.
What I used for filling: leftover cauliflower (no) mac and cheese. I made the cauliflower mac the night before with two types of cauliflower, heavy cream, and a cheese sauce of mozzarella, romano, and cheddar.

Low-Carb Pumpkin Custards with Whipped Cream

low-carb pumpkin custard with whipped creamLet's not kid ourselves: the crust is the best part of the pumpkin pie. It's typically the best part of any pie. But, if you're going keto or low-carb or have thing for self-denial, here's a pretty tasty alternative.

Ingredients

For the custard...

  • .5 cups pumpkin puree
  • 5 Tbsp Xylitol
  • 1 Tbsp pumpkin pie spice
  • 3 whole large eggs
  • .5 cup heavy whipping cream

For the whipped cream topping... 

  • .25 cup of heavy whipping cream
  • 1 tbsp Xylitol
  • .5 tsp vanilla extract

Instructions

For the custard...

  • Preheat your oven to 300 degrees. Boil some water.
  • Using a stand mixer (or large bow and an immersion blender), mix the pumpkin, xylitol, and pumpkin pie spice together until smooth.
  • Add the eggs and continue mixing.
  • Finally, add the heavy whipping cream and continue to mix until you reach an even consistency.
  • Pour your mixture into individual ramekins. Tip: you can use a measuring cup to ensure your serving sizes are even.
  • Place the ramekins in a deep roasting pan and place the pan (with the ramekins in it) in the oven.
  • Pour boiling water into the pan until the water reaches halfway up the side of the ramekins. This water bath prevents the outsides of your custard from over cooking while the interior of the custard continues to cook.
  • Bake for 45 minutes or until custards are just short of firm. There should be a slight jiggle to the custards, but a toothpick or skewer placed into the center of the custard should come out clean. The custards will firm up after they come out of the oven and even more so if you leave them in the fridge for a few hours/overnight.
  • Remove the pan from the oven and allow ramekins to cool on a cooling rack. When ramekins reach room temperature, cover and refrigerate for at least a few hours or even overnight.
  • Top with whipped cream before serving!

For the whipped cream...

  • combine heavy whipping cream, xylitol, and vanilla extract in a large bowl
  • whip with a whisk until you reach your desired fluffiness
  • dollop onto the center of your custard and dust with cinnamon

Some more pics... low-carb pumpkin custard uncooked in ramekinsYour mixture may look a little pale before it goes into the oven. That's okay! It will darken as it cooks.low-carb pumpkin custard cookedI didn't have a skewer or a toothpick, so I used the thin end of a chopstick to test firmness. Not the best choice, obviously. Luckily, I was covering up the center with whipped cream anyway.And, the finished product once again... Ta-da!low-carb pumpkin custard with whipped cream

Nutritional Info

You should get 6 servings out of this. The numbers per serving are:For the custard...

  • Calories: 255 
  • Fat: 27g
  • Protein: 3g
  • Net Carbs: 7g

For the whipped cream...

  • Calories: 40
  • Fat: 4g
  • Protein: 0g
  • Net Carbs: 0g

Hope you enjoy! 

What to Do with Leftover Turkey: Keto Broccoli Mushroom Bake

Keto Broccoli Mushroom Turkey BakeGot leftover turkey? Here's a quickie recipe to add some variety to the endless turkey-based meal slog that is the week after Thanksgiving.I ordered a six-pound turkey. I received a nine-pound turkey. This is too much turkey. Honestly, six was already pushing it for a household of two where one person is a vegetarian.I have too much turkey and I need to do stuff with it. Here's what I did this morning. Most of this was winging it with ingredients I had on hand and there was no measuring involved. So, do as you feel! Be yourself! Motivational slogans!

Ingredients

  • leftover turkey, shredded by fork. I shredded up enough to cover the bottom of a small baking dish.
  • leftover cream of mushroom soup. I made some yesterday, but canned is fine.
  • 1 medium broccoli bunch – roughly chopped and cleaned.
  • hella parmesan cheese, grated

Instructions

  • preheat your oven to 350 degrees
  • line your baking dish with a layer of shredded turkey
  • mix half your broccoli into your cream of mushroom soup
  • pour the mixture over the turkey
  • sprinkle remaining broccoli over the mixture
  • sprinkle parmesan over everything
  • bake for 25-30 minutes
Pics of how the layers go down...
Still more turkey to go, of course! Any suggestions for recipes would be greatly appreciated! 

Super Simple Sugar-Free No-Cook Keto Vegan Coconut Chocolate Pudding

coconut chocolate pudding snackHey, Keto friends. Do you miss desserts? I miss desserts. I miss them so much. I wanna eat a great big bowl of rocky road ice cream on top of a pair of eclairs, topped with some profiteroles and, oh, I dunno... a tub of hot fudge. That sounds like a nice treat.Anywho, to scratch that dessert itch, I've been experimenting with keto-friendly desserts. Here's my attempt at a chocolate pudding. It's super simple, super quick, and requires absolutely no cooking! Let me know what you think!

Super Simple Sugar-Free No-Cook Keto Vegan Coconut Chocolate Pudding

Ingredients

  • 1 can of full-fat organic coconut milk
  • 3 Tbsp., cocoa powder
  • 1 Tbsp., sugar-free maple syrup
  • .5 tsp., vanilla extract
  • a dash of sea salt to taste
  • a sprinkling of cayenne pepper

Instructions

  1. Refrigerate your can of coconut milk over night. 
  2. Separate the coconut milk solids from the remaining liquid. Set liquid aside.
  3. Combine all ingredients in the bowl of a stand mixer.
  4. Beat the mixture until you get a nice, pudding-like consistency. If you find the mixture to be too dry, add a tablespoon or two of the coconut milk liquids to the mixture to loosen it up.
  5. Transfer your completed pudding into little jars to refrigerate and eat later! Or, dig right in and enjoy!

Nutritional Info Per Serving

This recipe made about 3 servings for me – each about the size of a typical individual pudding cup. It's very rich, so a small serving is all you need.

  • Calories: 250
  • Fat: 25g
  • Protein: 3g
  • Carbs: 8g
  • Dietary Fiber: 2g
Some pics of the process!
Before eating, I sprinkled some coconut flakes and cayenne pepper over the pudding for just a little added texture and heat. I think it turned out great, but I'd LOVE to know what you think! Chocolate desserts can be so divisive! Is this recipe sweet enough? Chocolate-y enough? Try it out and let me know!  

Keto Spinach & Cheddar Soufflé

spinach souffles (1)I love meat. I adore it. There is no time of day – sleeping, showering, jury duty – when I couldn't go for a nice grass-fed ribeye. But, I acknowledge that there are folks out there who prefer their eats a little less "moo" and a lot more "imperceptible sound of plant growth." In fact, one of those people has been my boyfriend for the past 17 years. (Life is weird sometimes. I've learned to stop asking questions.)So, for him and several of my similarly meat-averse friends, I've decided to attempt some vegetarian keto cooking. This spinach soufflé was my first experiment. I thought it was damn delicious, frankly. That boyfriend guy liked it, too.

Relatively Simple Spinach & Cheddar Soufflé

Ingredients

The dish itself:

  • 3 egg yolks
  • 5 egg whites
  • 1/2 tsp., cream of tartar
  • 3 Tbsp., butter
  • 3 Tbsp., almond flour
  • 1 cup, heavy cream
  • 1 cup, shredded cheddar cheese
  • 1 bag, frozen chopped spinach (thawed and wrung out thoroughly)
  • salt and pepper to taste

And for prepping the ramekins (I used six individual 6-ounce ramekins, but you can use one great big dish, if you prefer):

  • butter 
  • grated parmesan cheese

Instructions

Prep:

  1. Preheat your oven to 350 degrees.
  2. Grease the insides of your ramekins (or large, oven-safe dish) with butter.
  3. Dust the greased ramekins (or dish) with grated parmesan cheese and set aside
  4. Separate the eggs, placing the whites in the (very clean, super dry) bowl of your stand mixer. Yolks can go in any old bowl.
  5. Add cream of tartar to mixing bowl and set aside.

Sauce:

  1. In a large pan, melt 3 Tbsp of butter over medium-high heat until it begins to bubble.
  2. Add the almond flour to the pan, stirring constantly to develop a smooth roux.
  3. Add the cream to the pan and continue to cook the mixture, stirring, stirring, stirring until smooth and thickened.
  4. Add the cheddar cheese and continue to stir, until the cheese has melted into the sauce.
  5.  Add the spinach to the sauce and stir some more. So much stirring.
  6. Season the spinach/cheese sauce mixture with salt and pepper to taste. You can season it pretty strongly at this point, as the final mixture will be diluted somewhat by the addition of eggs.
  7. Set aside to work on the eggs.

Eggs:

  1. Beat the egg whites in a stand mixer until they form soft peaks. I've heard other folks say that the whites should cling to the bowl as you roll it around in your hands. Still other folks say to whip them to firm peaks. I went somewhere in the middle.
  2. Add the yolks to the spinach/cheese sauce mixture and stir.
  3. Very gently fold your egg whites into spinach/cheese sauce mixture. I did this in two steps. First, I added about a quarter of the whites to the saucepan and folded gently. Then, I poured the entire mixture into the mixing bowl with the whites and continued to fold.

Bake:

  1. Once folded together, pour the completed mixture into your prepped ramekins/dish. You can place the ramekins on a single baking sheet to simplify the baking (and cleaning) process.
  2. Bake in your preheated oven for 30-40 minutes, until risen and golden brown. Important: DO NOT open the oven until at least 30 minutes have passed!
  3. Remove from oven, allow to cool for a few minutes (the soufflés will deflate slightly) and serve!

Nutritional Info Per Serving

This recipe made about 6.5 servings for me. I baked the remaining .5 in a small oven-safe bowl.

  • Calories: 358
  • Fat: 28g
  • Protein: 17g
  • Carbs: 4g
  • Dietary Fiber: 0g
And how about some pics from the whole soufflé-making process?
I think it turned out pretty well for a first attempt! I wish they had gotten a puffier. Perhaps I should have used milk instead of cream? Or dried the spinach more thoroughly? Or cleaned the mixing bowl better? Or beaten the whites harder? I will try the recipe again in the future and see how it all shakes out.If you give this recipe a shot, please let me know how it turns out for you and what you may do to alter it! I'd love to know!Hope you're doing super!

Winner Winner Chicken Lunch

Pan-Fried Chicken Mushrooms en Creme.pngI couldn't think of a clever preamble to this recipe. I considered referencing Food, Inc. and the terror of chickens it instilled in me. Then, I considered a reference to the amazing Jacques Pépin, his apparent love of chicken, and the recently released Jacques Pépin: The Art of Craft from the American Masters series.But, you know what? This is simple food. Let's give it a simple post. Fuck it.

Pan-Fried Chicken Thigh on Mushrooms à la Crème

Ingredients

  • 1 chicken thigh, skin and bone intact
  • 1 cup white mushrooms, cleaned and sliced
  • 1 Tbsp., crème fraîche
  • 1 tsp., freshly squeezed lemon juice
  • 1 tsp., fresh thyme leaves
  • .5 tsp., fresh lemon zest
  • salt and pepper to taste

Instructions

  1. Preheat your oven to 175 degrees Fahrenheit.
  2. Prepare your chicken thigh. Place the thigh, skin-side down on a cutting surface. With a knife, cut slits along either side of the thigh bone. This will help the meat cook more evenly/quickly by exposing more of its surface to heat.
  3. Season the thigh on both sides with salt and pepper.
  4. Place the thigh skin-side down in an unheated nonstick pan, then turn the heat to high. Do not add heat until the meat is in the pan!
  5. When you hear the thigh begin to sizzle, reduce the heat to medium, cover the pan, and continue cooking for about 15-18 minutes.
  6. Check your meat. Make sure it's not sticking to the pan. If the skin's browning too quickly, reduce the heat to low, recover, and continue to cook.
  7. Once cooked, transfer the chicken to a heat-safe dish and pop it into your preheated oven to keep warm while you cook the mushrooms.
  8. On the stove, turn the heat up to high and add mushrooms to the pan, sautéeing in the rendered chicken fat. Season with salt and pepper.
  9. Once mushrooms are tender, stir in crème fraîche, lemon juice, and lemon zest until mushrooms are well coated and the mixture is heated through.
  10. Before plating, sprinkle mushrooms with some fresh thyme and top with your chicken thigh.
  11. Nom away!

Nutritional Info

Pan-Fried Chicken Thigh (about 4oz):

  • Calories: 260
  • Fat: 16g
  • Protein: 28g
  • Carbs: 0g
  • Dietary Fiber: 0g

Mushrooms à la Crème:

  • Calories: 185
  • Fat: 18g
  • Protein: 2g
  • Carbs: 4g
  • Dietary Fiber: 1g

Notes

  • How can you tell the chicken is cooked? If you have a meat thermometer, look for an internal temperature of 165°F. Otherwise, you can generally tell that the meat is cooked when its juices run clear, rather than red (tinged with blood).
  • You can definitely cook more than one chicken thigh at once. I'm just using the one here because 1) my fiancé is a vegetarian and particularly hates even the smell of chicken and 2) the best part about this dish is the crispy skin! I prefer to cook only what I'll eat immediately, so the skin remains crisp, as opposed to soggy after storing and reheating.
  • Our friend Deb just suggested using a metal colander to cover the chicken while it's cooking on the stove. This will allow some of the moisture to dissipate, preventing soggy skin!
Ooh, how about some pics?
Enjoy!

Juicey (Lamb) Lucy

Lamb BurgerI've found it pretty easy to get stuck in a ground-meat rut on this Keto diet – it's cheap and easy and reasonably fatty. So, the other day, I challenged myself to do something a bit more interesting and a lot more photogenic. And, it's still super easy! Here's my ground lamb version of the classic Jucy Lucy on a little arugula salad.

Ingredients

  • 4 oz, ground lamb (grass-fed if you can get it!)
  • 2 Tbsp., feta cheese
  • .5 cup arugula (washed and dried)
  • 1 Tbsp., arugula blossoms
  • 1 tsp., chia seeds
  • 1 tsp., olive oil
  • .25 tsb., sherry vinegar
  • salt and pepper to taste

Instructions

  1. Divide ground lamb into two roughly even patties.
  2. Season both sides of each patty with salt and pepper.
  3. Create a small divot in one pattie, using your knuckles or a spoon. It doesn't need to be deep. You're just making a little home for your cheese.
  4. Drop 1 Tbsp. of feta cheese into the divot.
  5. Place remaining pattie over the first and gently pat down edges to seal the patties together. Just tuck that feta in, all snug and comfy.
  6. Cook the combined patty in a frying pan over medium heat – roughly four minutes per side. Due to the fattiness of the lamb, you probably won't need to add any oil. But, feel free to add a dash of olive oil if you care to.
  7. While your Jucy Lamb Lucy is cooking, combine arugula, arugula blossoms, sherry vinegar, chia seeds, remaining olive oil, and remaining feta cheese in a bowl and toss lightly. Season with salt and pepper to your preference
  8. Place the salad onto a dish.
  9. Place the Jucy Lamb Lucy over your salad.
  10. Enjoy!

Nutritional Information

Lamb Jucy Lucy:

  • Calories: 351
  • Fat: 26g
  • Protein: 24g
  • Carbohydrates: 1g
  • Dietary Fiber: 0g

Little Arugula Salad:

  • Calories: 137
  • Fat: 12g
  • Protein: 5g
  • Carbohydrates: 3g
  • Dietary Fiber: 2g
Picture time!
As always, I'd love to know what you think of the recipe! And, I'd love to hear about any keto lamb recipes of your own! Help me! :P

Keto Baking is Hard

DA882BF4-BC09-4F94-BE9E-E8AED327330A.jpgDespite all the benefits this keto lifestyle has provided, goddammit do I miss baked goods.So, this weekend, I tried my hand at two different baked goods – one savory, one sweet. The verdict? Maybe keto baking isn't for me. :(Still, I took some pictures and thought I'd share my failure all the same.First up, a savory coconut flour biscuit based loosely off this recipe. Rather than garlic and cheese, I went with sage, hazelnuts, and duck fat – I replaced half the butter called for with an equal amount of duck fat (about 2 Tbsp.) It went a little something like this:
VERDICT: Ehhh...  Everything smelled incredible, but the cookies themselves were dry and gritty. Again, I think I messed up with the amount of flour, so that's on me. Both the cookies and the spread had a noticeable tang of sugar substitute (I used Stevia in the Raw.) Perhaps I'm just too new to keto to appreciate a good sugar substitute (I still remember what real sugar tastes like), or I'm just using the wrong ones.While this weekend's experiments in keto baking were certainly fun and educational, I feel the overwhelming lesson was that keto baking is hard and I suck at it. I have a lot of learning left to do.